
Introduction
Welcome to this short guide on how to navigate and make the most of your WordPress blog. As one of the top content management systems, WordPress provides a user-friendly interface and a range of powerful features, empowering bloggers of all levels to express their ideas effortlessly. In this step-by-step walkthrough, we’ll take you through the process of logging in, creating a new post, and publishing it, ensuring a seamless and professional blogging experience. Let’s dive in!
Table of Contents
Blogging and SEO
Blogging can truly work wonders for your website’s SEO. When you consistently publish fresh and valuable content, search engines take notice and reward you with higher rankings in search results. By crafting engaging and shareable blog posts, you attract more visitors and encourage backlinking, which further boosts your visibility.
Strategically incorporating relevant keywords in your posts helps search engines understand your content and connect it with relevant searches. Thankfully, WordPress offers a range of SEO plugins and tools to optimize your content and improve your chances of ranking higher.
How To Post On Your WordPress Blog: Step-by-Step
Step 1: Logging In to Your WordPress Website
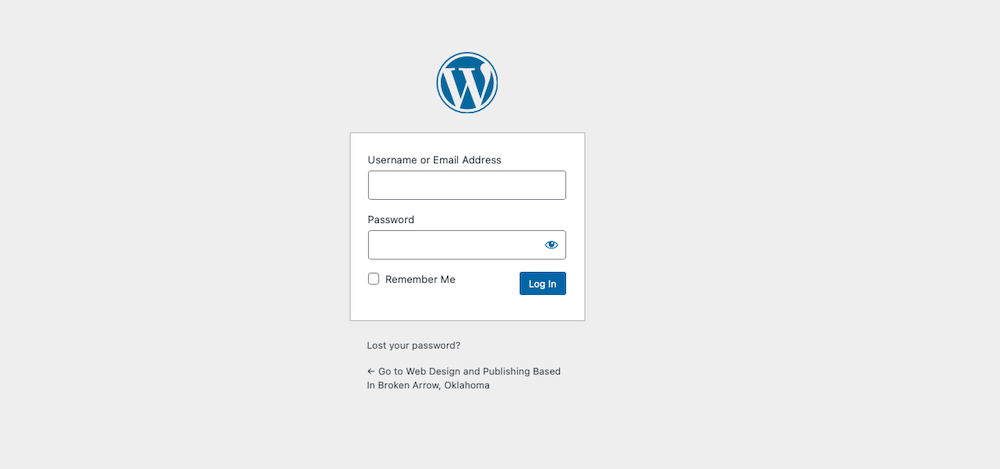
Begin by accessing your WordPress website through your preferred web browser. Append “/wp-admin” to the URL to reach the WordPress admin login page. If your site is under our maintenance plan, we take an extra step for security and change the login screen to something unique (reference your documentation or email us). Enter your username and password in the provided fields, and click the “Log In” button to gain access to the WordPress dashboard.
Step 2: Navigating to the Posts Section
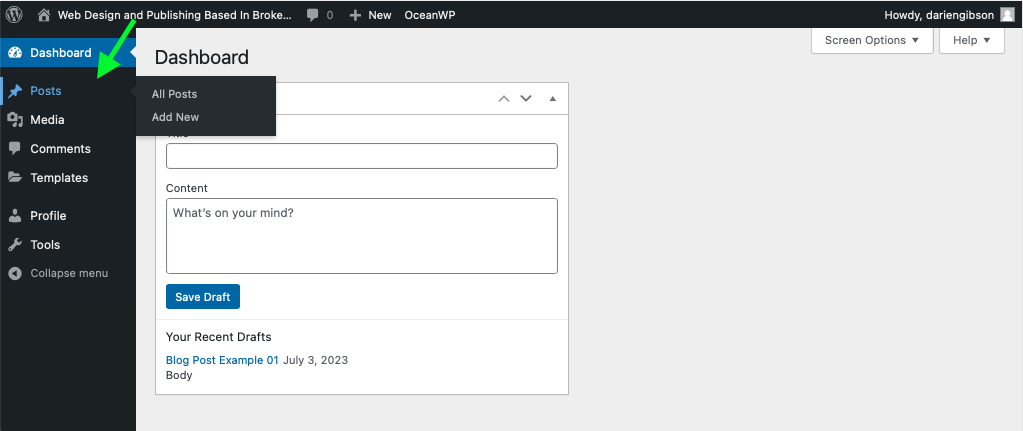
After you login, on the left-hand side, find the “Posts” option. Hover over it to reveal a dropdown menu, and select “Add New”. This creates a brand new post draft for you to write on. If you want to edit or browse your other posts, click “All Posts”.
Step 3: Creating a New Post
Crafting a good blog post involves several key elements.
- Start with a captivating headline to grab attention.
- Use a clear structure with engaging paragraphs and headings.
- Incorporate relevant images that visually enhance your content and make it more appealing.
With these elements, you can create a well-rounded blog post that engages readers and delivers your message effectively.
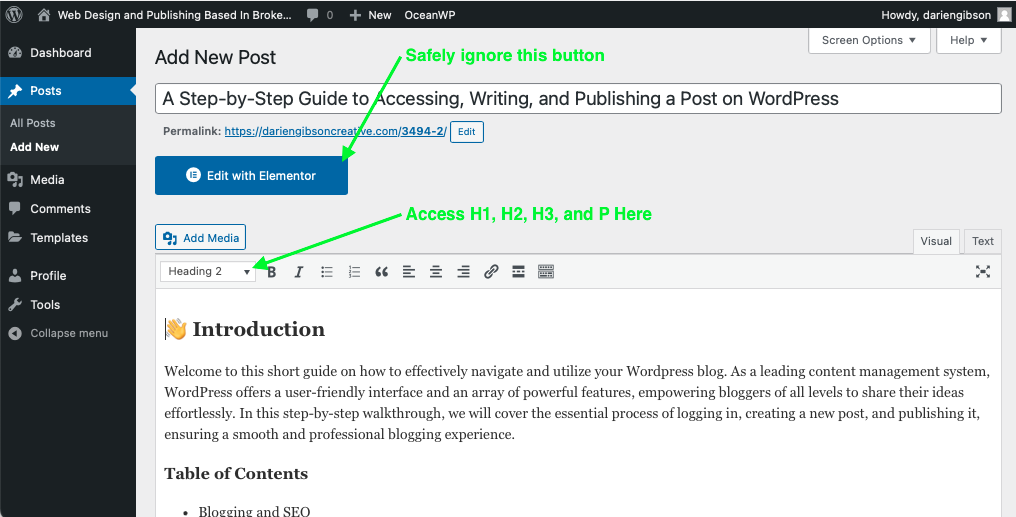
When writing a blog, H1, H2, H3, and P tags helps you organize ideas and give visitors a great reading experience. H1 is the ‘main title’ that tells people what your blog is about (this is added in the “Add Title” box). H2’s are smaller headings for the different sections of your post. H3’s helps you dissect your section into sub-sections. P tags are for the main paragraphs and text.
For example: This blog’s title “A Step-by-Step Guide to Accessing, Writing, and Publishing a Post on WordPress” is marked with the H1 Tag. The section “How To Post On Your WordPress Blog: Step-by-Step” is marked with a H2 Tag. And “Step 3: Creating a New Post” is marked with the H3 Tag. This text you are reading right now is marked with the P tag.
These tags help people and search engines understand your blog better, making it easier to read and find information.
Step 4: Adding Categories and Tags
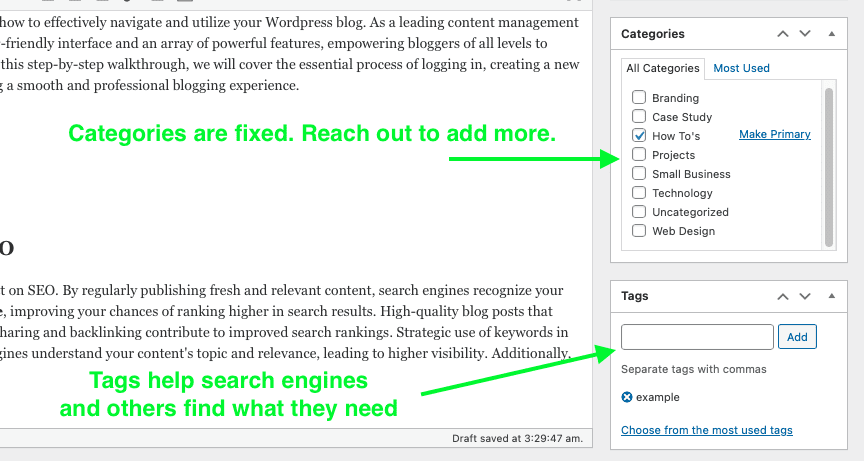
Effectively categorizing your blog posts is vital for organizing and improving navigation on your website. On the right-hand side of the editor, you will find the Document panel. Locate the “Categories” and select the appropriate categories to classify your post. Additionally, utilize the “Tags” section to attach relevant keywords that aid in content discovery.
*If you would like to add new category options, simply reach out with a list and we can update your system!
Step 5: Setting Featured Images
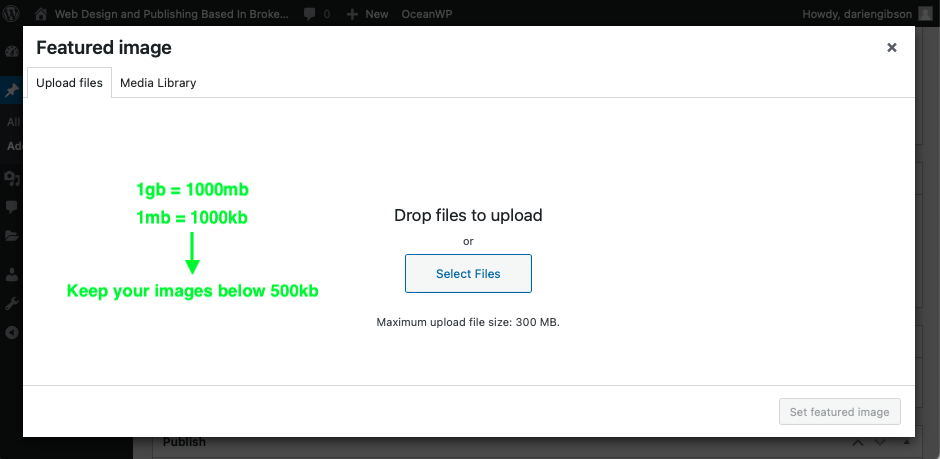
Capture your readers’ attention by selecting an enticing featured image for your blog post. Within the Document panel, scroll down to the “Featured Image” section. Click the “Set featured image” link to upload or select an image from your media library. Crop or resize the image if necessary, and confirm your selection to incorporate it into your posts. The ideal image is 1280x720px!
Also, be sure to keep your image sizes below 500kb. Here is a quick reference for file sizes.
Here are two free online tools to reduce the size of your images.
Step 6: Previewing and Publishing Your Post
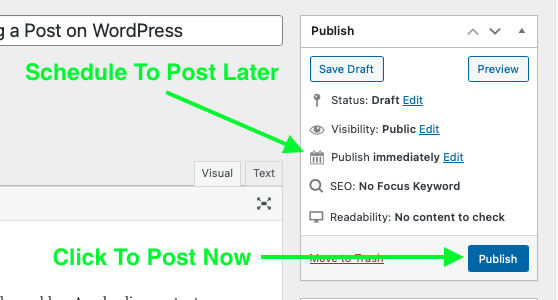
Before making your post visible to the world, take advantage of WordPress’s preview functionality. Click the “Preview” button to examine the final appearance of your post. Review the content, formatting, and overall presentation to ensure its accuracy and appeal. When satisfied, proceed to the crucial step of publishing your post. Click the “Publish” button to share your thoughts and ideas with your audience!
What’s Next?
Now that you’ve published your first blog post, it’s time to think about what’s next. Creating a content strategy for your blog is crucial for achieving your goals. A well-defined strategy allows you to plan, optimize, and measure the success of your blog, ultimately driving engagement, growth, and success.
If you’re interested in ongoing WordPress support and content marketing, check out this page for details on how you can set your site up for longevity and peace of mind.